Posts

Showing posts from 2012

Update on 101 Goals

Image
Two years ago, I wrote down a list of 101 goals that I wanted to accomplish in 1001 days. I went through my list today and updated it to reflect the stuff I'd finished and my thoughts on a few of the goals. Give up low-class humor at work (I am much better at curbing my rampant earthiness) Personal cookbook (6/12) Do a session in the Sacramento Temple Have a weekend with Brian in Morro Bay 4/12 Make soap (dismal failure and I'm perfectly content to buy my soap here at The Wild Plum ) Read lesson for next Sunday School (40x) (I am in Primary most weeks, so don't go, but that's not a good excuse not to be PREPARED) Save $1000 (I save this and promptly use it to pay some new bill. :( ) Sell badges Buy a Silhouette cutter (not sure if I want to do this anymore now that I've spent my money purchasing a new archival photo printer that was recommended to me by Genine ) Learn Spanish (Learn in your Car)

Natural Dyeing Results

Image
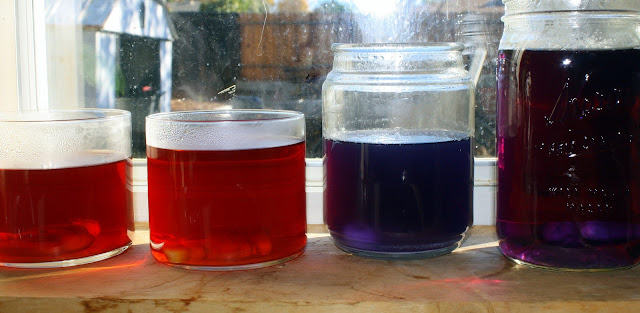
A few days ago, I posted that I was experimenting with natural dyes. I'd gotten the idea from several posts in a lovely blog I follow - lilfish studios . Lisa is an avid dyer using materials gathered from the nearby woods. I, on the other hand, used foodstuffs procured from Walmart. I'm classy like that. In the picture above, I have (from left to right): red onion skins, yellow onion skins, red cabbage with baking soda and last, plain red cabbage. You can see the plaster figures in the dye jars above. When I first pulled them out (after an overnight soak), they were rather disappointing - very pale. I let the plaster dry on my windowsill and forgot about them. A few days later I noticed that the figures were no longer pale. Ta da! I have no idea of the chemistry magic behind this, but I'm glad that I know how to dye my stuff brown, turquoise and light blue if I ever need... Clockwise from top left: yellow skins (terracotta), cabbage with soda (turquois

Mingos and Sharp Parts

Image
My husband has just made his first book available through Amazon ! It's a hilarious account of my son Kiff and his very interesting view of the world. Includes all things important to great literature: sex! violence! pasta! (just kidding about the pasta) For only 99 cents, you too can pee your pants with laughing... :) And learn entirely too much about our parenting style. Please don't call CPS. Thank you.

Plantable Christmas Cards

Image
I wanted to do something different for this month's letter writing venture. It had to be simple and useful. When I write letters, I like to include a recipe or something tangible. Looking in my closet o'goodies, I found the leftover stack of handmade paper I'd made for my library's Mother's Day craft. It's paper infused with flower seeds. Voila! Christmas cards with style!

Natural Dyeing

Image
It wasn't until I took this picture that I realized I haven't cleaned the outside window in a few months! We're going to be doing a presentation at the library about natural dyes. I wanted to dye plaster because that's something we have access to at my branch. I used (from left to right) red onion, yellow onion, red cabbage with baking powder and just plain red cabbage.

Yet Another Paper Ball Ornament Tutorial

Image
This is what you can make. Go! Make!  I did a Pay it Forward Christmas ornament thing this year with a bunch of friends. I decided to do these little paper ornaments. Easy. 15 minutes each. You'll like them. This will be mainly a picture tutorial. I've just finished grading about 800 finals this week and I'm too pooped to pop. Supplies Supplies: Paper Circle punch (I used a variety to make different-sized balls. The balls end up the same size as the original circle. hot glue ribbon ignore the pins. They are not used. How did they get in the picture? Cut out EIGHT circles for each half of the ornament Bend in half like a taco. DO NOT FOLD. Pinch. Fold in quarter. Crease fold. Leave petal ends lovely and round. Dab on hot glue. Do not burn self. (I did not listen to me) Attach next segment. Take care not to squish petals. Just keep adding until you get to the next to the last. Before gluing in last segment, add ribbon,

It's an Omen!

Image
For those of you who are fans of Douglas Adams ' The Hitchhiker's Guide to the Galaxy , you will know why I am seeing an omen here... :) Thank you again to all of you for supporting me in my little venture. Here's to making it a bigger venture! *Clink!*

My Shop is Live

Image
If you look at the bottom of my header, you'll see a few tabs, one of which says Shop. If you click on it, you will find that you can now purchase my Basic Folded Book Tutorial directly from this blog. The best part about it is that after purchase, you have it delivered automatically via the magic robots that do that sort of thing. This is only the first item to go in the shop. I will be adding the Alphabet and Number pattern sets soon. When the lowercase letter pattern set is ready, it will be launched exclusively from this new shop. BTW, I will be combining it with my uppercase alphabet set and selling it at a major discount for those who've already purchased the uppercase set. Yay! I'm still keeping my Etsy shop for a while, but really think this is going to be better, both for me and for my fellow folders. Who doesn't want to get their product right after they order it? Sheesh! That's the biggest concern I have right now - people having to wait for me

On the Rocks

Image
 A couple of weeks ago, I was working feverishly on my lowercase alphabet pattern set. Then, I came down with the worst cold I've had in years. I had to miss a few days of work (in a ROW!!!) and felt like doing nothing more than sitting and staring at a wall. I've mended now, but the fever for folding books has been tempered a bit. I am impatient to finish the pattern set, but am still a bit torpid. I still just want to sit and do quiet things. I believe one of my struggles in life is to overcome the need to DO DO DO DO DO all the time. I had a dream once where a person asked me "When are you going to stop?" I looked at the dream person like they were crazy. But since I keep remembering that dream, it is most likely a message to me. (eek!) Enough about philosophizing. I love this spider webby-looking rock. Spiral stitch, made up as I went.

New Shop in the Works

Image
I've got such good news! Two things: 1) Rhymes With Magic Art is on Facebook . Please go take a look! I will be posting my art and my art thoughts (such as they are...) on a quickie basis. It's all good. And... 2) I'm in the process of starting up a new shop . This shop will be linked from my blog and one will be able to purchase my downloadable tutorials and pattern sets and get them with NO waiting! Right now, the way it is with Etsy, a person has to wait for me to get their email and then I send the file. Ugh. So old-fashioned. With this new shop, the download is instant and I REALLY look forward to that. I'm a little nervous, too. Yikes!

Little Letters

Image
Look what is coming soon!

Hearts and Love

Image
A special order for a customer... I am sick right now. It's been several years since I last had a cold, but this one's got me knocked for a loop. I can't taste any of my food. What is there to live for? :)

Moody Paintings

Image
This painting was done a couple three years ago. I began to try recognizable things - landscapes in this case. I was still copying my teacher at this point, using the micron pen to divide up my painting. It kinda reminds me of looking out a window. Or through wires. I love how the "trees" seem to evaporate into the sky. It is important to note that my edges are dirty on this piece. I did have masking tape on it, trying to keep it even, but failed utterly. You can see that I have totally abandoned the "keep the edges nice and neat" thing. Someday art historians will look back at this and say I was in a confused period and my art echoed the chaos in my life. Baloney, really, but I like how it looks.

My College Watercolors

Image
I finally found my stride in my art major about four months before my BFA project was due. Before this time, I was still struggling to find my art voice. I actually dislike that term, but I don't know any other way to describe the thing that happens when you stop copying others' work so obviously and begin to timidly step out onto your own road. I had a teacher I really admired who did little watercolors. They were the most beautiful things to me. He tore his watercolor paper (the large sheets) into 16 smaller sheets - all about 6x8 in. big.  He drew with his micron pen and then watercolored over it in beautiful abstract washes. I was mesmerized. I thought it was magic and I wanted to paint magic, too. I honestly don't know how I found this style of painting. I think I started out by tearing my paper really small - 4x6 inches (half the size of my teacher's stuff - I was dainty and feminine!). I then taped out a rectangle and drew a few lines to delineate areas

Honeycomb Book - Tutorial

Image
♥THANK YOU TO EVERYONE FOR HELPING MY SISTER ♥ A while ago, a person showed me a really pretty picture of a book whose pages looked like honeycomb and asked me how it was done. It reminds me of those decorations of the 70's - did anybody else have those at their parties? They were the height o' haute. I kept the email in my inbox because I promised her I'd show her how it was done. Here's my take on a honeycomb book: Supplies: You need an old book, glue and a pencil. I also used a colored pencil but you don't have to. Use a page to fold in quarters (see marks 1, 2 and 3). Using your folded paper as a guide, make marks in pencil where your folds are. Using your marks as a guide, draw lines down across the fore edge of your book using a ruler or a piece of cardstock to make them nice and straight. THE TOP AND BOTTOM EDGES COUNT AS A MARK. If they aren't perfectly straight, that's not really a problem. Approximate is good enough.I